

Caring for Your Knees for a Better, Active Life
Why We Need to Show Our Knees Some Love
As the years go by, our knees can start to feel the effects of all the miles we’ve put on them. Natural wear and tear—sometimes called osteoarthritis—can make the cartilage a bit thinner, leading to that all-too-familiar morning stiffness. Since our knees carry our full weight with every step, they are often the first to tell us when they need a break. Taking care of them isn’t just about avoiding aches; it’s about making sure you can keep enjoying your independence, whether that’s gardening, traveling, or just keeping up with the grandkids.
Getting to Know Your Knees (The Basics)
Think of your knee as the ultimate multitasker! It’s a clever hinge joint that connects your thigh and shin, but it’s much more than just a mechanical part. Inside, you have cartilage and meniscus, which act like premium shock absorbers for your body. Ligaments and tendons work behind the scenes to keep everything stable and moving smoothly.
Your Built-in Support System: Strengthening the Surrounding Muscles
Here’s a little secret: your knees don’t have to do all the heavy lifting alone! They have an incredible natural support system made up of your quadriceps, hamstrings, and glutes. When these muscles are strong and happy, they wrap around the joint like a protective sleeve, taking the pressure off the bone and acting as your body’s personal shock absorbers. If these muscles get a bit weak, the joint has to work harder, which can lead to inflammation. By giving these muscles a little workout, you’re essentially giving your knees a much-needed holiday!
When Is the Best Time to Exercise?
You might wonder, “When should I actually do these exercises?” A morning “wake-up” routine is a fantastic way to start. Moving your legs gently before you even get out of bed helps get the synovial fluid (your body’s natural joint oil) flowing, so you don’t feel so creaky when your feet hit the floor. It’s also a great idea to do a quick 5-minute warm-up before any big activity, like a long walk or a workout. prevents pains or injuries.
Why Yoga is a Best Friend for Your Knees
Yoga is like a gentle “tune-up” for your knees because it combines soft stretching with moves that build strength and keep everything lined up properly. By practicing yoga, you help your body’s natural bodyguards (your leg muscles) get stronger so they can protect the joint. It also helps your “joint oil” circulate better, which keeps you feeling flexible instead of stiff. Plus, yoga teaches you better balance and awareness, so you’re less likely to twist your knee the wrong way or get an unexpected injury during your daily activities.
Simple Habits for Happy Joints
The best knee care often happens outside the gym. Keeping a healthy weight is one of the kindest things you can do for your joints—even losing a few pounds can feel like taking a heavy backpack off your knees! Your shoes also matter more than you might think; a supportive pair keeps your alignment straight and prevents unnecessary twisting. If you love staying active but want to be gentle, try low-impact fun like swimming , yoga or cycling. Your knees will thank you for the movement.
Taking Care of Yourself at Home
You are the expert on your own body! If your knees feel a bit grumpy after a long day, simple home comforts like the R.I.C.E. method (Rest, Ice, Compression, Elevation) work wonders. A warm heat pack is perfect for soothing stiffness in the morning, while a cold pack is your go-to for any swelling after a busy afternoon. By staying curious and trying out these small, mindful habits, you’re making a wonderful investment in your future. Here’s to many more years of moving with ease and confidence!.
Here are a few low-impact exercises you should try to keep your knees healthy
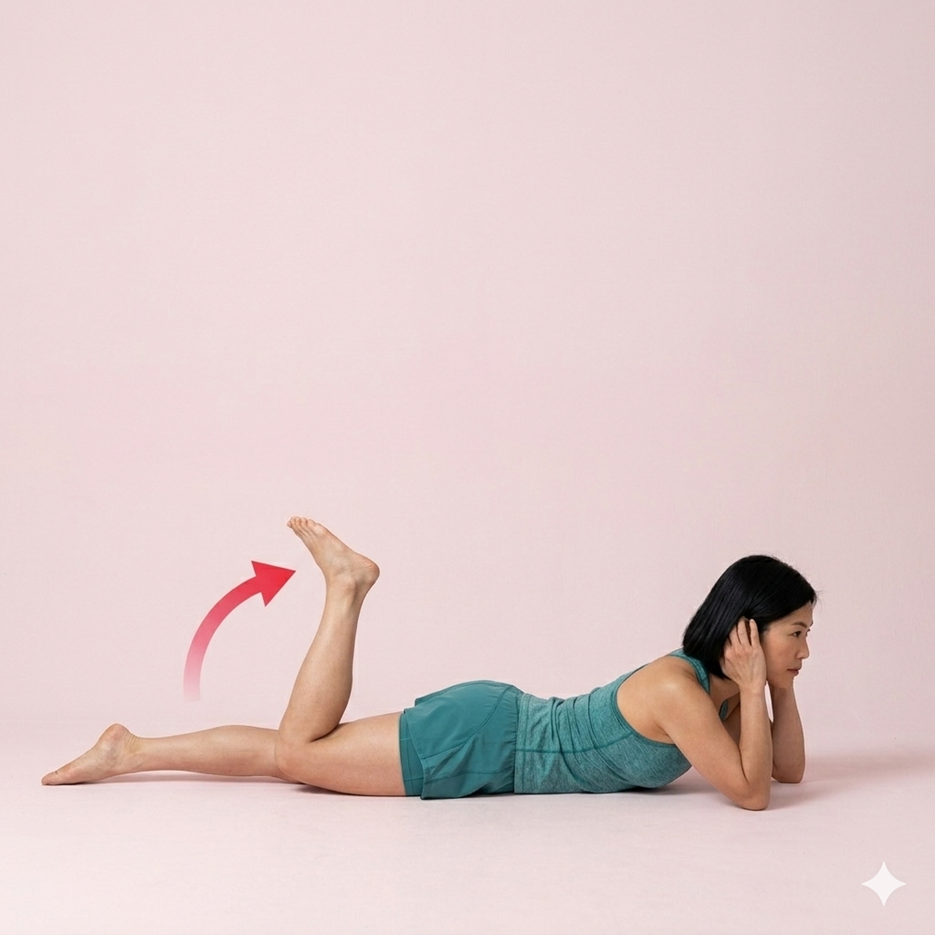
Knee Strengthening Leg Lift
Tightness in the lower legs can often be a silent contributor to knee discomfort. If your calves are tight, it puts added stress on your knee joints and alters your natural gait. This simple calf stretch, utilizing the support of a wall, is a fundamental exercise to enhance flexibility and help create more space and stability in your knees.
Step-by-Step Instructions
- Facing the Wall: Stand facing a stable wall, placing both hands firmly on the wall surface at about shoulder height and distance.
- Establish Stability: Step one foot forward toward the wall (this knee will be slightly bent for support). Step the foot you want to stretch straight back, keeping the heel on the floor.
- The Stretch: Keeping your back leg completely straight and your back heel firmly grounded, slowly hinge forward from your hips and lean your chest toward the wall.
- Hold and Breathe: Lean forward only until you feel a profound, pleasant stretch through the calf and down to the heel of the back leg. Take 5-10 deep, controlled breaths, allowing the muscle to gradually release.
- Focus on Proper Alignment: Keep both of your feet facing directly toward the wall. Do not allow your feet to turn inward or outward to compensate for the tightness. Keep your spine long and your core gently engaged.
- Switch Sides: Slowly release the stretch and step forward to return to a neutral standing position. Reset and repeat the pose, switching which leg is forward and which leg is back.
Key Tips for a Supportive Calf Stretch:
- Protect the Back Knee: Ensure you do not “lock out” or hyperextend the back knee joint. Keep a subtle, imperceptible softness in the joint to engage the leg muscles.
- Neutral Neck: Resist the urge to tuck your chin or craning your head up. Keep your gaze directly straight ahead at the wall, with your ears over your shoulders.
- Modification: If your lower back is tight or your spine rounds even when sitting upright, sit on the edge of a folded blanket to elevate your pelvis. This helps your hips tilt forward.
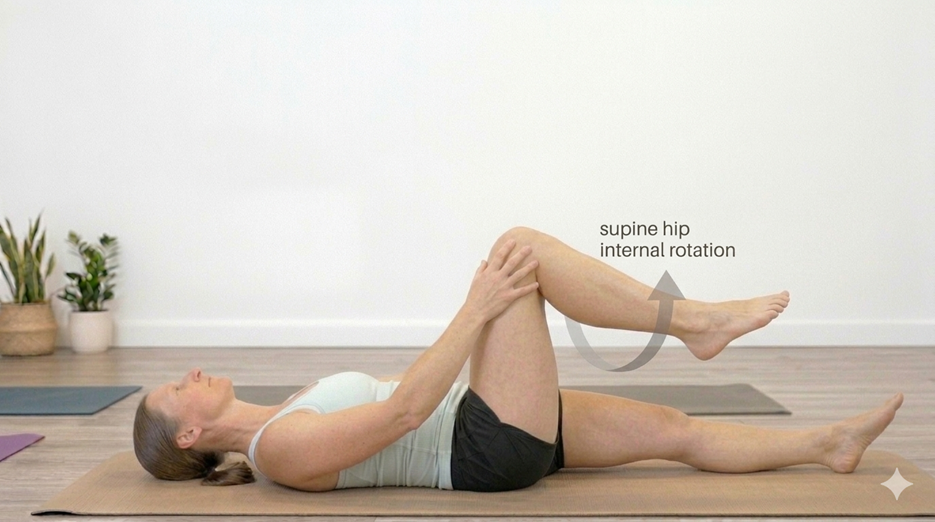
Supine Hip Internal Rotation
Supine Hip Internal Rotation
This exercise helps improve mobility and range of motion in the hip joint. Follow these steps to perform the movement safely:
Step-by-Step Instructions
- Starting Position: Lie flat on your back (supine) on a yoga mat or firm surface. Ensure your head, neck, and shoulders are relaxed and resting comfortably on the floor.
- Leg Placement: Keep your left leg extended straight on the mat. Bend your right knee and lift your thigh until it is perpendicular to the floor (forming a $90^{\circ}$ angle at the hip).
- Hand Grip: Place your right hand on the outside of your right knee to provide gentle stability and guidance.
- The Movement: Keeping your knee in a fixed position, slowly rotate your right foot and lower leg outward, away from the midline of your body. This action creates internal rotation at the hip joint.
- Return: Gently bring the foot back to the center. Repeat for the desired number of repetitions, then switch to the left leg.
Tips for Success
- Keep it Smooth: Move in a slow, controlled manner. Avoid jerky movements.
- Stability: Keep your pelvis and lower back flat on the mat; don’t let your hips tilt as you rotate the leg.
- Breath: Inhale as you prepare, and exhale as you rotate the hip.
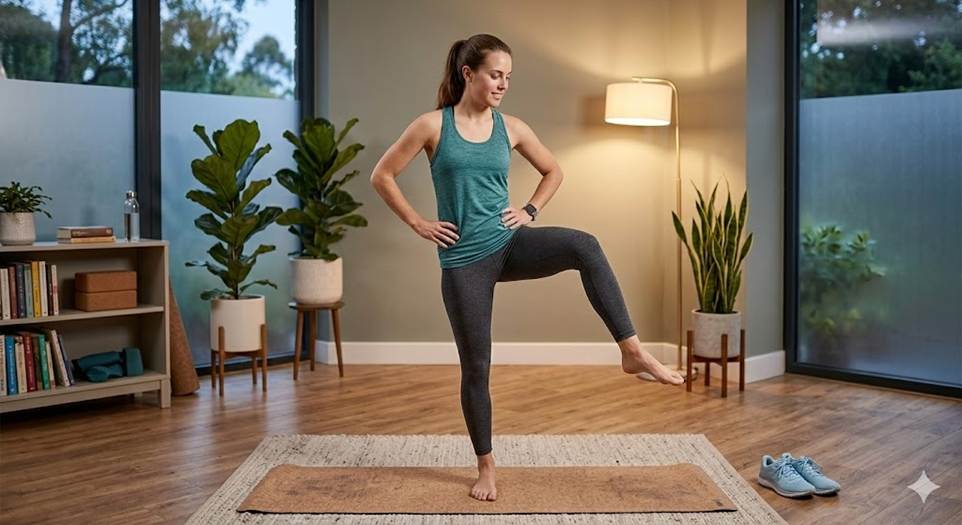
Side Hip Rotation
Step-by-Step Instructions
- Set Your Base: Stand tall on your mat with your feet hip-width apart. Root your standing leg firmly into the ground.
- Find Your Balance: Place both hands on your hips to keep your pelvis level. If you feel wobbly, you can place one hand on a wall for support.
- The Lift: Slowly lift one knee toward your chest until your thigh is parallel to the floor (flexion). Keep your foot flexed.
- The Open: Keeping your knee high, slowly rotate your leg out to the side as far as your hip allows without moving your torso (abduction).
- The Internal Rotation: This is the tricky part! While keeping your knee out to the side, try to rotate your ankle upward toward the ceiling, turning your thigh bone inward.
- The Sweep: Slowly circle the leg back behind you and lower it until your knees are aligned again, then reverse the entire circle back to the start.
Leg Stretch & Release
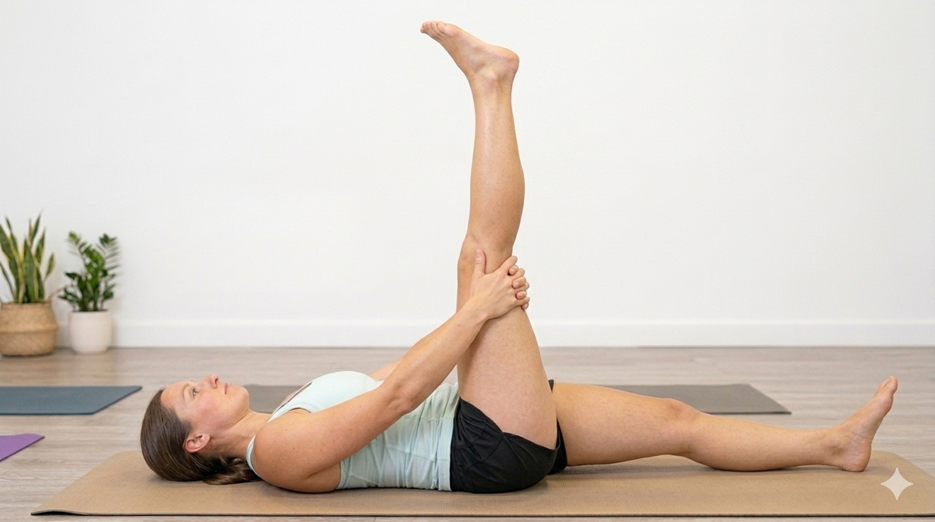
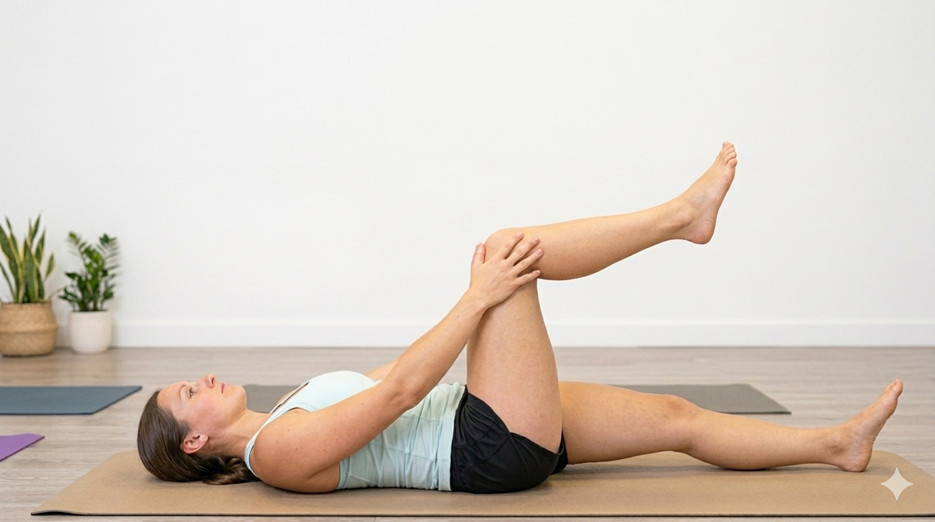
Step-by-Step Instructions:
- Starting Position: Lie flat on your back on a yoga mat. Keep both legs straight out in front of you.
- The Bent Knee Hold: Bend your right knee and use both hands to gently pull your thigh in toward your chest. Keep your left leg relaxed and resting on the floor. Hold this position for a few seconds to stretch the lower back and glutes.
- The Flex & Stretch: Keeping your knee hugged in, flex your right foot (toes point up toward the ceiling). Slowly extend your lower leg upward, pointing your heel directly toward the ceiling until you feel a gentle stretch down the back of your hamstring. It is fine to keep a micro-bend in the knee if you have tight hamstrings.
- Reset: Slowly bend your knee back to your chest and then lower your foot to the floor, sliding your leg out to the straight position. Repeat on the left side.
Form Tips:
- Protect Your Back: Press your belly button down toward your spine to keep your lower back neutral and supported on the floor.
- Neutral Neck: Keep your neck long and relaxed, and do not let your shoulders scrunch up toward your ears.
Standing Quadriceps Stretch
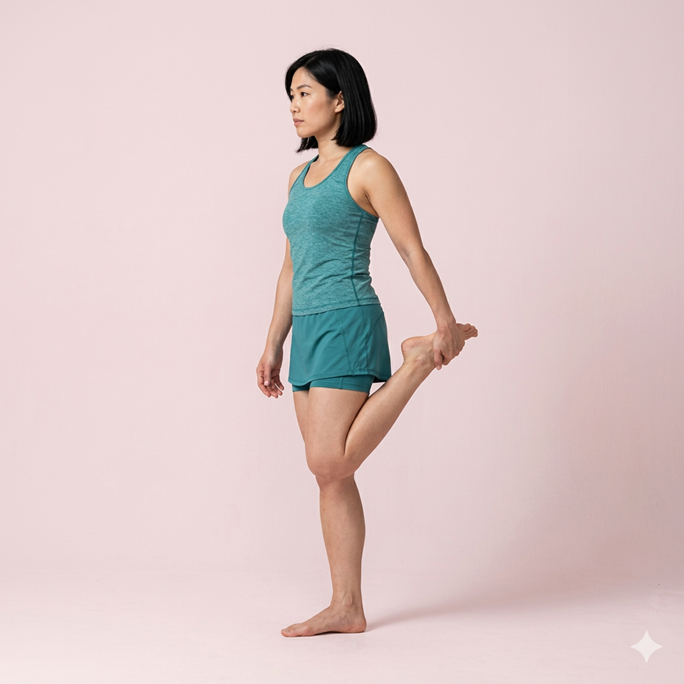
This pose is designed to stretch the front of the thigh, which can help relieve tension around the kneecap and improve overall joint flexibility.
Instructions for Knee Pain Relief
- Starting Position: Stand tall with your feet hip-width apart. If you feel unsteady, place one hand on a wall or a sturdy chair for balance.
- The Lift: Shift your weight onto your left leg. Bend your right knee, bringing your heel toward your glutes.
- The Grip: Reach back with your right hand and grasp your ankle or the top of your foot.
- Alignment: Keep your knees close together. Avoid letting the bent knee flare out to the side, as this can put uneven pressure on the joint.
- The Stretch: Gently tuck your pelvis forward and pull your heel closer to your body until you feel a comfortable stretch in the front of your thigh.
- Duration: Hold for 20–30 seconds while breathing deeply, then slowly release and switch legs.
Tips for Sensitive Knees
- Don’t Over-Flex: If bending the knee this deeply causes sharp pain, use a yoga strap or a towel looped around your ankle to hold the leg instead of your hand.
- Micro-bend: Keep a very slight “micro-bend” in your standing leg to avoid locking the joint.
- Active Core: Engage your abdominal muscles to keep your lower back flat, which ensures the stretch stays in the quadriceps and doesn’t strain the spine.
Cycling
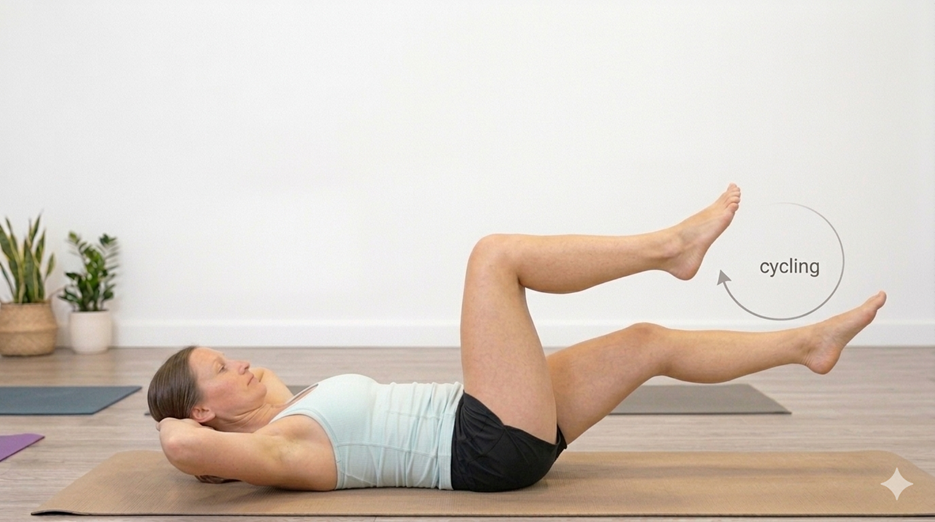
Step-by-Step Instructions
- Starting Position: Lie on your back on a yoga mat with your legs extended.
- Upper Body Setup: Place your hands behind your head, supporting the base of your skull with your elbows flared out to the sides.
- The Movement: Lift both legs off the mat. Bend one knee toward your chest while simultaneously extending the other leg straight out, keeping it hovering just above the floor.
- The “Cycle”: Smoothly switch positions by drawing the extended leg in and pushing the bent leg out in a continuous, circular motion, as if pedaling a bicycle.
- Core Engagement: Keep your lower back pressed firmly into the mat throughout the entire movement to protect your spine and maximize abdominal engagement.
Form Tips
- Breathing: Maintain steady, rhythmic breathing—exhale as you extend a leg and inhale as you switch.
- Neck Safety: Avoid pulling on your neck with your hands; keep the chin slightly tucked and let your core do the work of stabilizing your torso.
- Pace: Perform the movement with control rather than speed to ensure you are not using momentum
Hip rotation
Step-by-Step Instructions
- Starting Position: Lie flat on your back on a yoga mat with your legs extended.
- The Set-Up: Bend your right knee and lift it toward your chest until your thigh is perpendicular to the floor.
- Stabilize: Use your hands to hold your knee in place, ensuring your upper leg remains still throughout the movement.
- The Rotation: Keeping your knee centered, slowly rotate your right hip outward away from the midline of your body.
- The Focus: Focus entirely on the rotation occurring at the (the ball of your hip joint).
- Reset: Slowly bring your foot back to the center and repeat for the desired number of reps before switching to the left leg.
Form Tips
- Isolate the Movement: Ensure your hips stay flat on the mat; do not let your lower back arch or your pelvis tilt to help the leg move further.
- Steady Pace: Perform the rotation with control to properly engage the deep hip rotators.
Heels up and down lift

Step-by-Step Instructions
- Starting Position: Stand tall on your yoga mat with your feet parallel and hip-width apart.
- Arm Placement: Keep your arms relaxed at your sides as shown in the profile view.
- The Lift: Slowly push through the balls of your feet to lift your heels off the floor.
- Peak Tension: Rise as high as possible onto your toes while maintaining your balance and keeping your core engaged.
- The Descent: Slowly lower your heels back down to the mat in a controlled motion.
- Repetition: Repeat the “up and down” motion for your desired number of repetitions.
Form Tips
- Control: Avoid bouncing; the movement should be slow and steady to maximize muscle engagement.
- Alignment: Keep your weight centered over your big and second toes to prevent your ankles from rolling outward.
- Posture: Maintain a neutral spine and look straight ahead throughout the exercise.
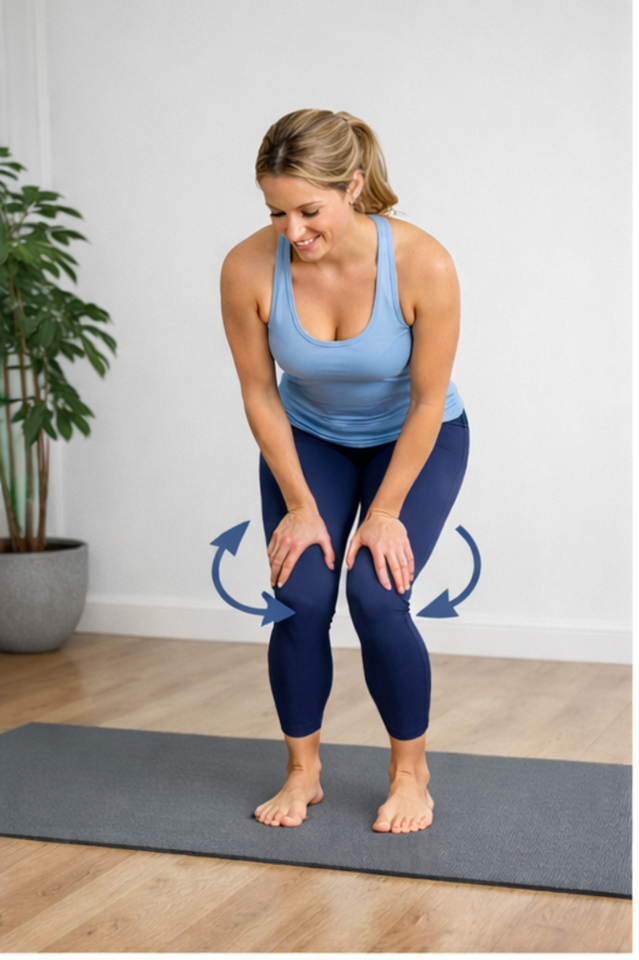
Patellar Movement Exercise (Knee Mobility)
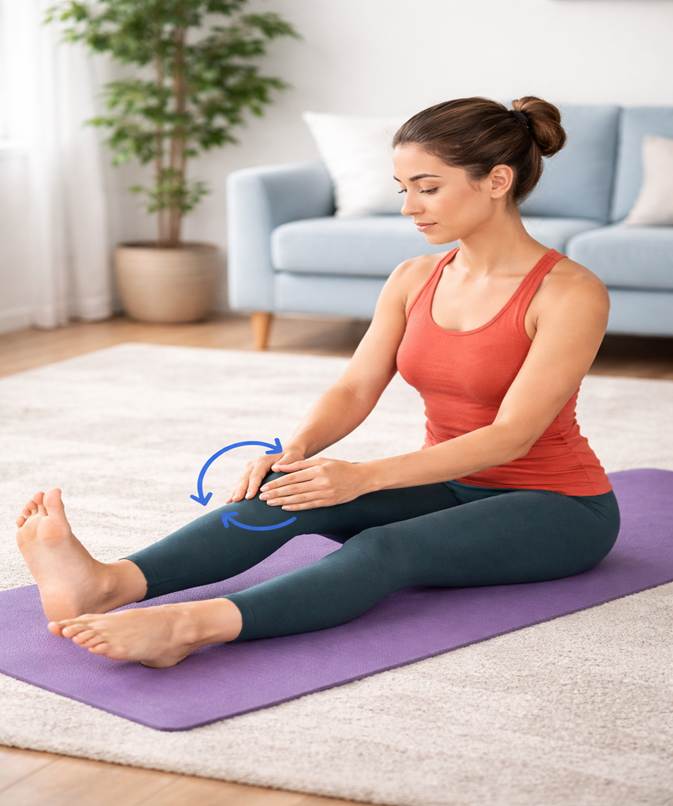
Purpose: Improves knee joint mobility, reduces stiffness, and supports patellar tracking.
Instructions:
- Sit on the floor with your legs extended straight in front of you.
- Keep your back straight and core engaged.
- Place both hands gently on your knee.
- Slowly move your knee cap (patella) in small circular motions—first clockwise, then counterclockwise.
- Perform 10–15 rotations in each direction.
- Repeat 2–3 times per knee, maintaining a slow and controlled motion.
- Breathe deeply and avoid forcing any movement; stop if you feel pain.
Tip: This is a low-impact exercise, ideal for maintaining healthy knee function and preparing the joint for more active movement.
Janu Sirsasana Pose (Head-to-Knee Pose)
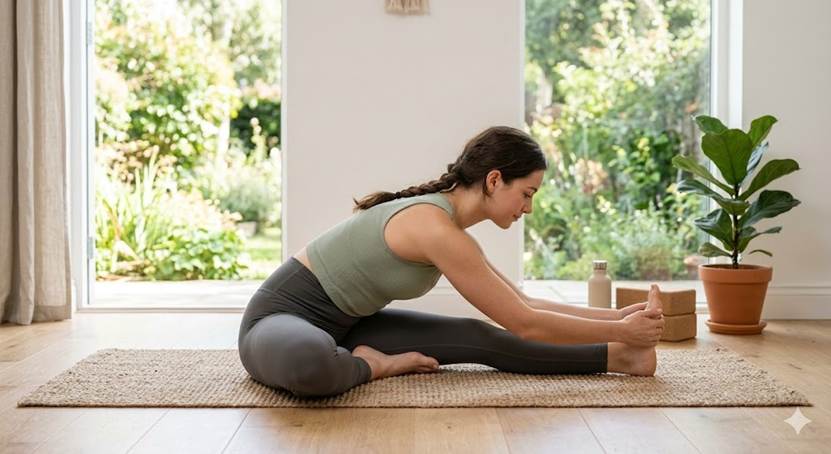
Step-by-Step Instructions
1. Establish the Foundation (Staff Pose)
- Begin seated on your mat with both legs extended straight in front of you (Dandasana or Staff Pose).
- Press your sit bones firmly into the floor and lengthen your spine up from the base.
- Flex both feet, pointing your toes toward the ceiling.
2. Bend the Knee
- Inhale, and use your hands to gently bend your right knee.
- Open the right knee out to the side, allowing the hip to externally rotate.
- Press the sole of your right foot into the inner thigh of your left (extended) leg. Place the heel close to your groin.
- Modification: If your right knee is floating or strained, place a block, blanket, or cushion underneath it for support.
3. Align and Lengthen
- Turn your torso slightly toward your extended left leg, squaring your chest over the thigh crease.
- Inhale, and reach both arms up toward the ceiling, creating maximum space and length along your spine.
4. The Forward Fold
- Exhale and hinge forward from your hips (not your waist). Lead with your heart, keeping your spine long as you lower your torso toward your extended left leg.
- Reaching with hands: Take hold of your left foot, ankle, or shin—wherever you can comfortably reach without rounding your back or straining. If you cannot reach your foot, use a yoga strap looped around the sole of the foot and hold the ends.
5. Hold and Deepen
- With every inhale, visualize the crown of your head reaching forward, further lengthening the spine.
- With every exhale, release into the fold, deepening the stretch across the hamstrings and lower back without forcing.
- Goal of the Pose: The intention is not to touch your head to your knee, but to create space in the hips and hamstrings. Allow your gaze to rest gently on your toes or shin.
- Remain in the pose for 5–10 deep, controlled breaths.
6. Release and Repeat
- To exit, inhale, and use your core strength to rise back up to an upright seated position.
- Extend the right leg to join the left. Pause in Dandasana, then repeat the pose on the other side.
Key Alignment and Safety Tips
- Protect the Back: The most common mistake is rounding the lower and upper back to “reach” the foot. Keep the spine long and fold only as far as your hamstring flexibility allows.
- Foot and Knee Placement: Avoid placing your bent-knee foot against the knee of the straight leg; it should rest against the upper inner thigh or the groin to prevent strain on the knee joint.
- Propping the Hips: If your lower back is tight or your spine rounds even when sitting upright, sit on the edge of a folded blanket to elevate your pelvis. This helps your hips tilt forward.
Bird-Dog
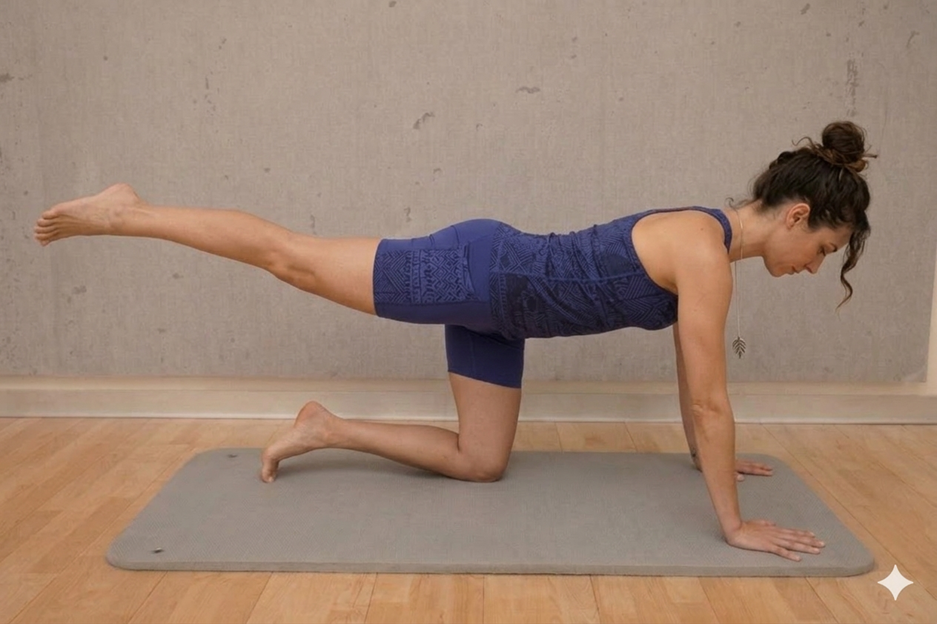
This pose, often called the Bird-Dog, is a fantastic way to build core stability and improve coordination. Follow these steps to perform it correctly:
- Starting Position: Begin on all fours on your mat with your hands directly under your shoulders and your knees under your hips.
- Engagement: Tighten your core muscles to keep your back flat and stable.
- The Extension: Simultaneously lift your right leg straight back behind you while extending your left arm straight forward.
- Alignment: Keep your hips level with the floor and your neck in a neutral position, looking down at the mat.
- Hold: Maintain this balance for 3 to 5 deep breaths.
- Switch: Lower your limbs back to the starting position and repeat the movement with the opposite arm and leg.
Supine twist
Step-by-Step Instructions
- Starting Position: Lie flat on your back on your mat with your legs extended and arms resting at your sides.
- The Knee Draw: Bend your right knee and draw it in toward your chest.
- The Twist: Use your left hand to gently guide your right knee across your body toward the floor on your left side.
- Arm Extension: Extend your right arm out to the side at shoulder height, keeping your palm facing up to help anchor your right shoulder to the floor.
- The Gaze: If it feels comfortable for your neck, turn your head to look over your right shoulder.
- Hold: Stay in the twist for 5–10 deep breaths, feeling the stretch along your outer hip and lower back.
- Switch: Slowly return to the center and repeat the sequence on the opposite side.
Single Leg Raise (Supta Eka Pada Uttanasana Variation)
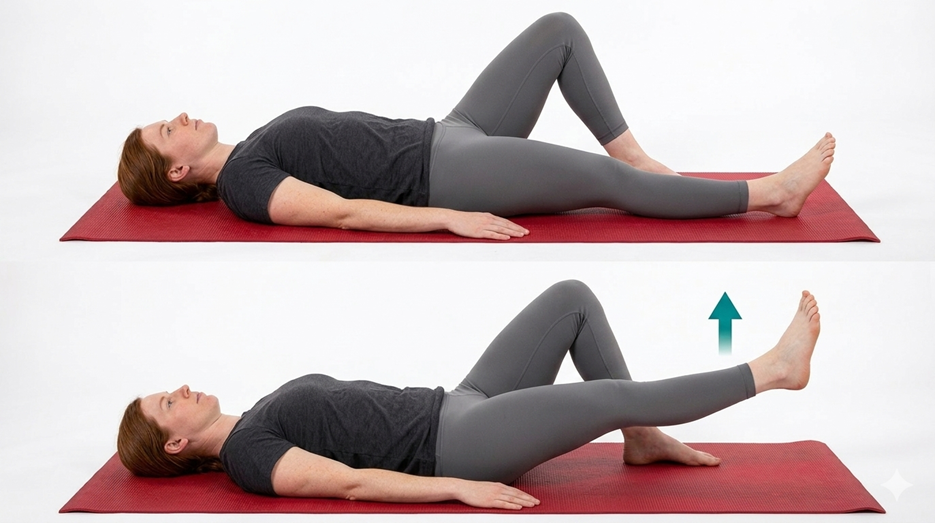
This is a gentle, mindful practice that builds core strength while maintaining calm, steady breathing.
Starting Position
- Lie down comfortably on your back in Savasana
- Keep your legs extended and arms relaxed beside your body, palms facing down
- Relax your shoulders, jaw, and face
Step-by-Step Practice
1. Prepare
- Bend your right knee and place the foot flat on the floor
- Keep your left leg extended and active (toes pointing upward)
- Take a slow, deep breath in
2. Lift the Leg
- As you exhale, slowly lift your left leg up
- Keep the leg straight without locking the knee
- Lift only as high as you can without straining or arching your lower back
3. Hold with Awareness
- Breathe normally and hold for 3–5 breaths
- Keep your abdomen gently engaged
- Ensure your hips remain grounded and stable
4. Lower Down
- Inhale gently
- Exhale and slowly lower the leg back to the floor with control
5. Repeat
- Practice 5–10 rounds on one side
- Then switch legs
A variation of Ardha Shalabhasana (Half Locust with knee bend)
Starting Position
- Lie on your stomach (prone position).
- Extend both legs straight back, tops of the feet resting on the mat.
- Place your elbows under your shoulders and gently support your head with your hands.
- Relax your shoulders and keep your chest slightly lifted.
Step-by-Step Practice
1. Ground the Body
- Press your hips and pelvis gently into the mat.
- Keep the left leg extended and relaxed.
2. Inhale – Bend the Knee
- Slowly bend your right knee, bringing your heel toward your buttocks.
- Keep thighs grounded; only the lower leg moves.
3. Hold with Awareness
- Breathe naturally.
- Feel the engagement in the hamstrings and back of the thigh.
- Keep the neck relaxed and gaze soft.
4. Exhale – Release
- Slowly lower the foot back to the mat with control.
- Avoid sudden or jerky movements.
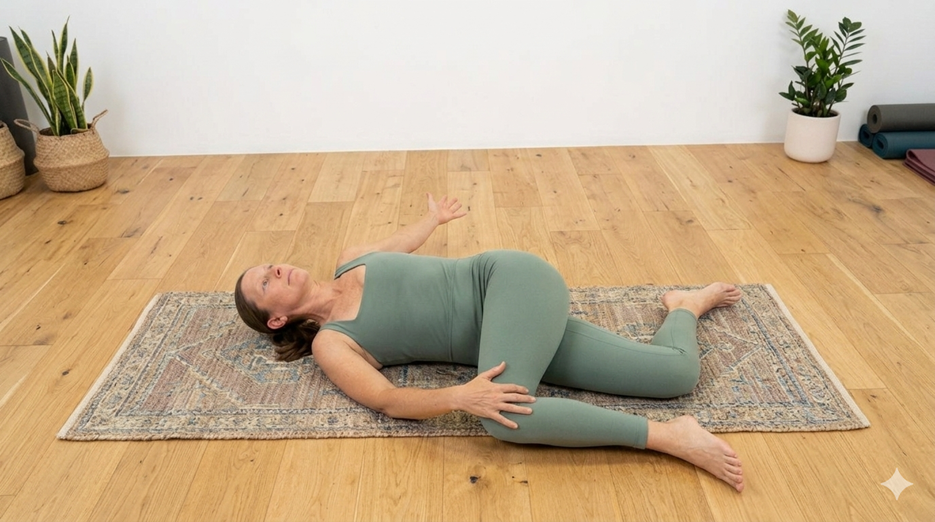
Variation of Supta Baddha Konasana (Restorative Rest Pose)
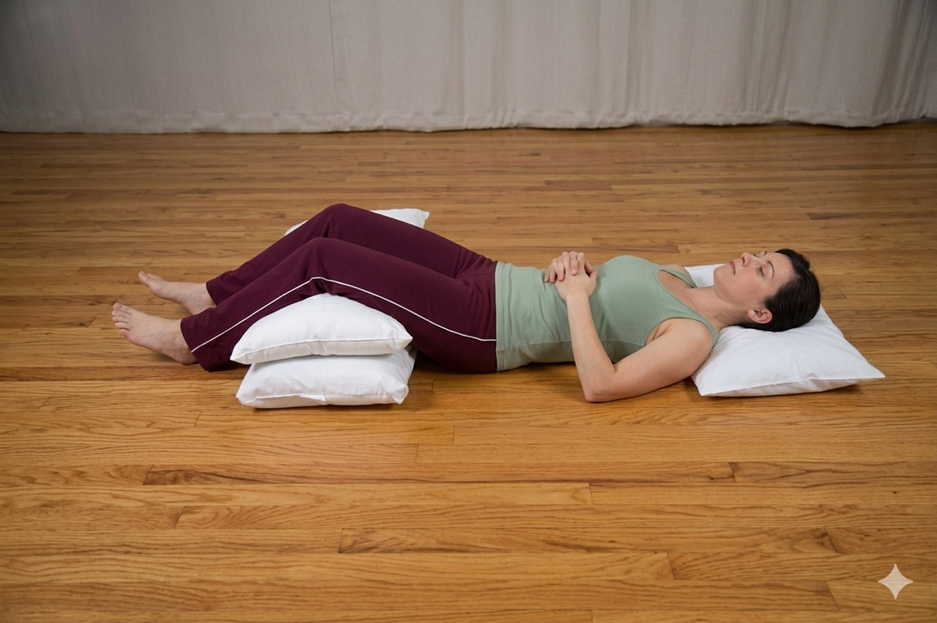
Purpose of the Pose
This is a deeply calming, restorative position designed to:
- Relax body and knee joints
- Release lower back tension
- Support deep diaphragmatic breathing
- Reduce anxiety and fatigue
Setting Up the Pose
- Lie Down Comfortably
- Lie on your back on a yoga mat.
- Place a pillow or cushion under your head for neck support.
- Support the Legs
- Bend both knees slightly
- Place one or two pillows under the knees or thighs to fully support the legs.
- Allow the hips and lower back to relax completely.
- Hand Placement
- Rest your hands gently on your abdomen or by your sides.
- Soften the shoulders and arms.
Relaxation Instructions
1. Settle the Body
- Close your eyes.
- Let the entire body sink into the support beneath you.
2. Deep Breathing
- Inhale slowly through the nose, allowing the belly to rise.
- Exhale gently, letting the body soften further.
- Continue slow, natural breathing.
3. Release Tension
- Soften the jaw, eyes, and forehead.
- Relax the hips, thighs, and lower back.
- Feel the support holding you effortlessly.
")
")

")

